Drive Fusor From a Controller
This tutorial builds a controller profile: a saved set of bindings that maps buttons on your hardware to the player's functions, so you can reach them with both hands already on a controller.
It is the one tutorial that needs hardware you may not have, which is why it is optional.
Before you start
- Auto Run Mode done, so you know what each function you are about to bind does.
- Actions and Pad Mode done if you want to bind pads. Its Tutorials pack is what those pads will fire.
- A MIDI controller with a spare button or pad, connected, and not held exclusively by your DJ application. On Windows a WinMM port can only be opened by one application at a time. A controller with more than one MIDI endpoint, or a virtual port you can route a copy to, avoids the conflict.
1. Same controller, or a dedicated one
By default the Fusor controller is Same as my DJ controller: one physical controller controls both your DJ application and the Fusor player, and any spare button or pad on it can drive the Fusor player. This tutorial dedicates a separate controller instead, so its picker needs a profile other than Same, on a MIDI input that differs from your DJ controller's. A profile sharing the DJ controller's input is never offered here. The picker also offers None, which leaves the DJ controller's Fusor controls inactive.
With a separate Fusor controller, each controller controls only its own application, and the Fusor controller is never watched for pickup. See Hardware Controller → Two controllers, one job each for what changes.
2. Open Mapping
gear icon → the Mapping entry → Fusor controller tab.
A bar across the top of the tab manages the controller profile: a Controller dropdown and a gear icon. Below it is the list of functions, one row each, plus a Shift 1 and a Shift 2 row at the top.
Choosing a profile in the dropdown makes it the active controller and connects it, using the MIDI input stored in that profile. The same choice is offered on Settings → Connection, and the two agree; Connection is also where the connection state shows, green Connected, orange Not plugged in, gray None chosen. Neither appears on this tab.
The gear opens everything else profile management needs:
| Field | What it is |
|---|---|
| Profile name | The profile's name. Free-form. |
| MIDI input | Which port the profile listens on. |
| Clear Fusor controls | Removes this profile's button bindings and Shift keys, after a Cancel / Clear prompt. |
| New profile / Delete profile | Make a fresh profile, or remove the selected one. Delete asks first and names what goes with the profile. |
3. Create a profile
- Click the gear, then New profile. A fresh profile opens for editing, chosen at once.
- Set Profile name to the controller's name, so you can tell profiles apart later.
- Set MIDI input to your controller's port. The dropdown lists every MIDI input Fusor Studio can see. Fusor Studio connects to it as soon as you choose it: there is no further step.
A profile is one .fcontroller file, and the port is part of the profile, so switching profiles
also switches which port is being listened to. You can keep several side by side, one per physical
controller, or several variants of one controller. Only one is active as your Fusor controller at a
time; your DJ controller, if you have one, keeps its own profile active alongside it.
If the port can't be opened, a red panel in the gear popover gives the reason:
- Port in use. Another application holds it, most often your DJ application. Close the holder, or pick a different port.
- Port not found. The controller is not plugged in. Fusor Studio switches to reconnect polling automatically, and Settings → Connection reports it orange, Not plugged in, until it appears.
4. Learn a button
MIDI Learn listens on the MIDI input selected for the profile you are editing, so a brand-new profile can learn immediately.
- Find the Arm / Play row. Click Learn. The Control cell changes to a Listening… press it badge.
- Press the pad or button you want, two or three times, so Fusor Studio gets a clean read.
- It accepts on its own, about 0.4 seconds after your input settles. The badge updates to show what was detected, Note C3 · ch 1 or CC 23 · ch 1, and the binding is saved.
There is no confirm button. To cancel, press Esc or click the badge.
The Type cell now shows an auto-detected control type: button, knob or encoder. It is a read-only badge and detection is the only thing that sets it. If a control is detected wrongly, re-Learn it and repeat the motion a few more times so the value pattern is unambiguous.
Why it uses the most frequent message. Fusor Studio picks the dominant MIDI source in the learn buffer, so a pad triggered by accident or a jittering wheel does not set the binding. That is also why repeating the motion helps.
If the selected port is missing or already held by another application, you get an error naming which, instead of a listening badge. The causes are the same as when you set the port in step 3.
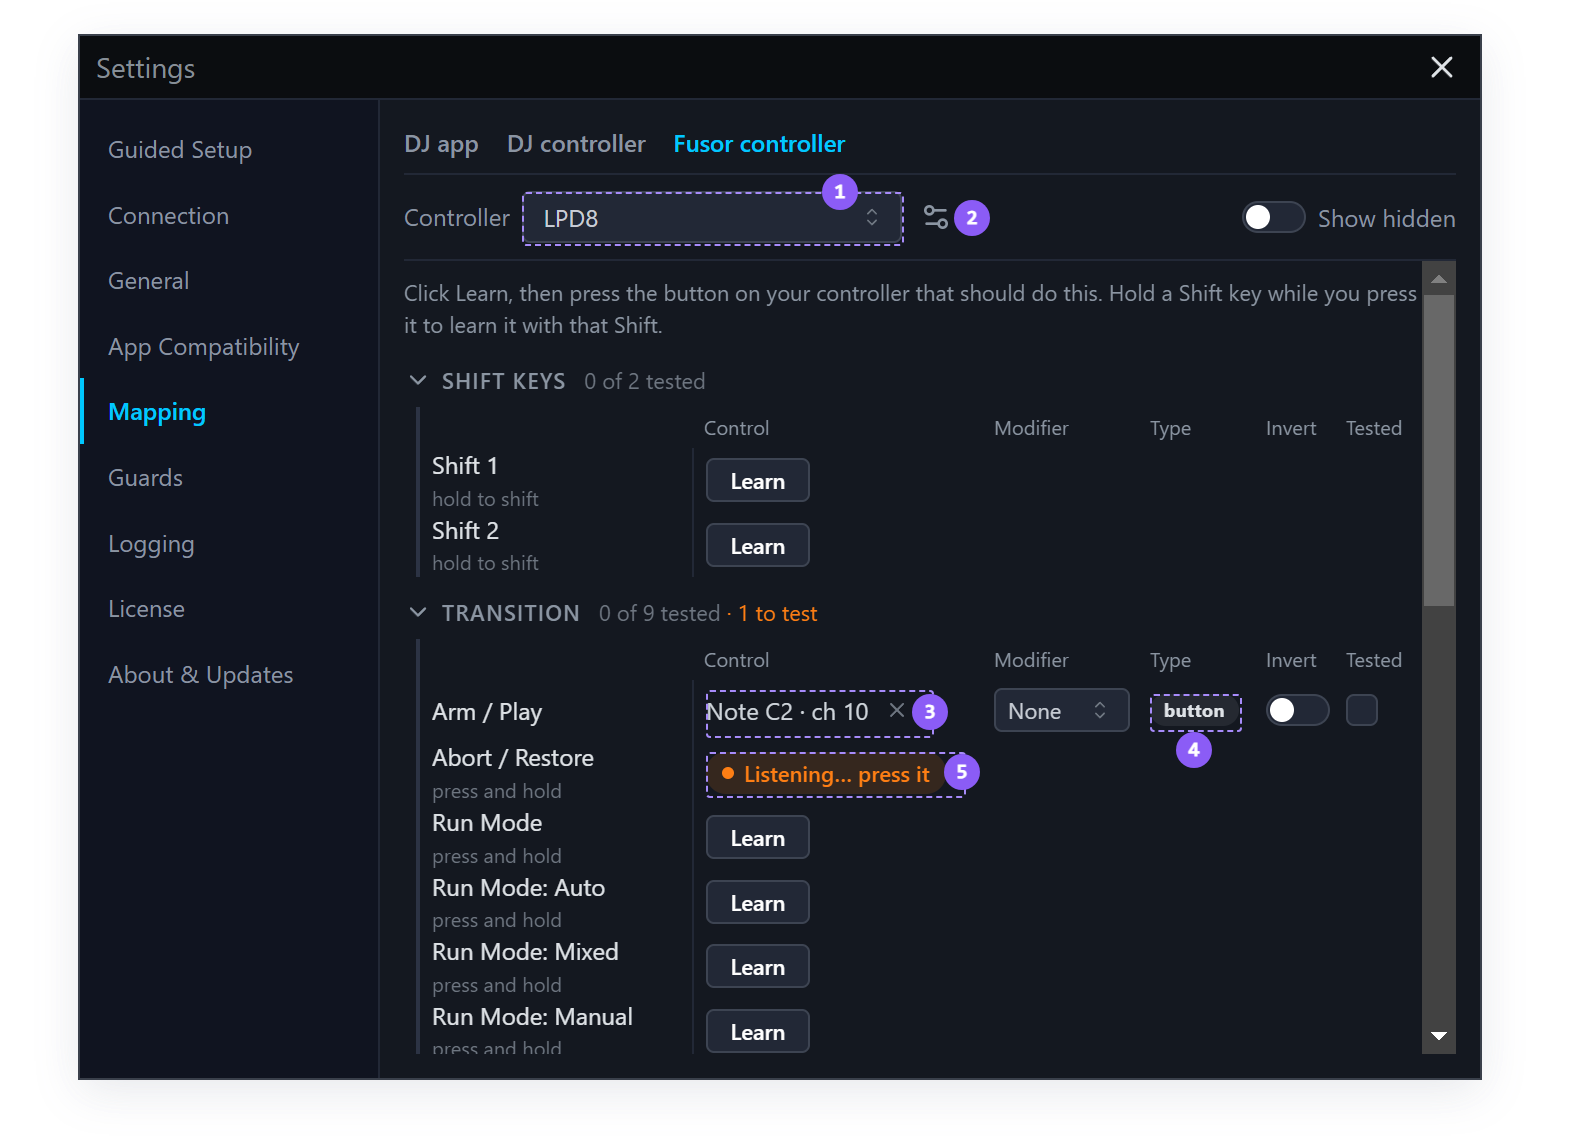
- Controller: the profile dropdown. Choosing a profile connects it.
- Gear: profile name, MIDI input, and the profile's other settings.
- A bound Control cell: the MIDI message learned, with an × to clear it.
- Type: detected from what you pressed. Read-only.
- Listening… press it: this row is learning. Press Esc or click the badge to cancel.
5. Bind the rest of the transport
Repeat step 4 for the functions you reach for most:
| Function | What it does |
|---|---|
| Arm / Play | Arms the loaded fusor, then starts or pauses it depending on state. |
| Abort / Restore | Aborts the running transition. |
| Tempo Ramp | Toggles the Tempo Ramp option. |
| Swap Roles | Swaps which deck is incoming and which is outgoing, as the Swap Roles button in the toolbar does. Does nothing during a transition or in Pad Mode. |
| Next Fusor / Prev Fusor | Load the next or previous fusor in the active collection. |
| Pad Mode | Turns Pad Mode on or off, as the Pad Mode button in the toolbar does. |
| Pad 1 – Pad 8 | Fire the action assigned to each pad slot. |
Two rows behave in ways worth knowing before you bind them.
Next / Prev Fusor load as they go. Each press loads the fusor it lands on, so you keep pressing
until the one you want is in the Fusor player, and the list wraps at both ends. Every press writes where
you landed to the status line, like Warmup · 3 of 11. Because loading disarms the player and clears
the session tweaks on the fusor you are leaving, browsing is refused during a transition and while
the player is armed: "Can't change Fusor during a transition" and "Disarm to browse Fusors".
Pads 1–8 fire the active pack's slots. With the Tutorials pack from Actions and Pad Mode active, binding three pads puts Mixer FX to Reverb, Mixer FX Put Back and Timed Bass Kill on them.
Each row also has Clear (remove the binding) and Inv (invert the trigger polarity). Button functions normally fire on a Note On with non-zero velocity, or a CC value ≥ 64; with Inv on they fire on Note Off or CC < 64. Use it when your hardware sends release-side messages.
There is no Save button anywhere in Mapping: every binding wrote to the profile the moment Learn accepted it, and the profile has been connected and routing since you set its MIDI input in step 3.
Load a fusor, prepare your decks, and press your Arm / Play button. It behaves exactly as the on-screen control does: the button's MIDI message reaches its binding, and the binding calls the same function the click calls.
6. Add a Shift layer
Most controllers have a Shift button, and many have two, one per deck. Fusor controller has a Shift 1 and a Shift 2 row at the top of its list.
- Click Learn in the Shift 1 row and tap your controller's Shift key. It learns like any other row.
- Now Learn a second function onto a button you have already bound, Abort / Restore on the same pad you gave to Arm / Play. Hold Shift while you press it.
Learn captures that as Shift 1 automatically, with no need to touch the Modifier dropdown afterwards. One pad, two functions.
Which physical key is Shift 1 is your choice. Fusor Studio reads which MIDI command arrived, so whatever you learn into the Shift 1 row is Shift 1.
Each function row's Modifier dropdown sets when that binding fires:
- None: only when neither Shift key is held. The default.
- Shift 1 / Shift 2: only while that key is held.
- Either: while either is held. Offered only once you have learned both.
None means unshifted only. Hold Shift and press a control that has only a None binding and nothing happens. Without this rule, a shifted press would also fire the control's unshifted binding.
Your controller may already have one
Many controllers send a different MIDI command under their own Shift. When that is true of the control you are binding, Fusor Studio's Shift rows are unnecessary for it: hold your controller's Shift while you Learn, and the shifted command is bound directly. As far as Fusor Studio is concerned it is a different button.
To find out which case you are in, Learn the control twice, once plain and once with your controller's Shift held, and compare the two Control cells. Same command both times means you need the Shift rows.
Faders and knobs usually do not change command under Shift, so for them the Shift rows are the only way to bind a shifted function.
7. When one press fires two things
Every binding that matches fires, so two functions on one control can both run from a single press. The list says so in orange above it, naming the control, the Shift state and the functions involved:
One press of Note C-1 · ch 9 with Shift 1 held fires Tempo Ramp and Run Mode. Give them different Modifier settings if that isn't what you want.
The Control cells of those rows turn orange too, so you can spot them further down the list.
One overlap is easy to miss: Either overlapping a named key. An Either binding fires under Shift 1, so it goes off alongside anything scoped Shift 1 on the same control, even though the two rows show different Modifier settings.
A Shift 1 and a Shift 2 binding sharing one control is not flagged. That is the ordinary way to get two functions out of one pad.
What you learned
- That a profile is one controller's bindings plus the port it listens on, saved as a
.fcontrollerfile. - That choosing a profile is what makes it active and connects it: there is no separate switch, and MIDI Learn listens on the profile's own port regardless.
- That with a separate Fusor controller, each controller controls only its own application, and the two only share a MIDI input by falling back to Same.
- That Learn accepts on its own, uses the most frequent source, and detects the control type from the value pattern.
- That the connection state, green, orange or gray, shows on Settings → Connection, not on this tab, and that a separate Fusor controller gets its own light there.
- That every binding writes immediately, with no Save step.
- That holding Shift during Learn scopes the binding to that Shift key.
- That None means unshifted only.
- That every matching binding fires, and the list warns you when two do.
Where to next
- Author Your First Action: the start of the Authoring Tutorials, and actions of your own for those pads.
- Hardware Controller: every function, the
.fcontrollerformat, auto-reconnect, and clearing a Shift key. - Pad Mode: the runtime side of the pads you just bound.
- Troubleshooting → Hardware controller issues: port errors, learn quirks, and reconnect edge cases.