Change a Curve and Run It Again
Every fusor you have run so far was authored by somebody else. This tutorial opens one up.
The fusor is the Middle Channel Fader you ran in Channel Fader. It modulates the two channel faders and nothing else, so the curve is the only variable. Its 1 / 2 switch is on 1, Constant Power, where that tutorial left it. You will read the shape, reshape it, save it, and run the difference.
What you save in the curve editor is written to the .fusor file on disk.
Before you start
- Channel Fader done. You will be reading a loaded fusor's domain cards in Session View again.
- Your crossfader in bypass. This fusor modulates only the channel faders, so a crossfader still in the signal path changes deck level throughout the run as well. The three setups are in Crossfader Setup and Deck-Level Modulation.
- Two tracks whose blend you know well. You are going to run the same transition twice and compare, so familiar material is worth more than interesting material.
1. Run it as it shipped
Load the Middle Channel Fader from the picker, the row whose middle dot is filled.
Set up the run: push the crossfader hard over to the outgoing side so the outgoing role goes to the deck you are mixing out of, start the outgoing deck playing, and cue the incoming deck. Put the outgoing deck's channel fader at 100% and the incoming deck's at 0%, which is where the two curves begin.
Press PLAY and listen to the whole run. Pay attention to the middle, where both tracks are audible at once. A crossfade can dip or swell in loudness there. A constant-power curve is shaped to keep the output level consistent across the whole run.
Press END at the completion wait. That run is your reference.
2. Open the curves
- Library (book icon) → Fusors in the window header → Fusors sub-tab.
- Click the info icon on the Channel Fader row with the Middle mix point (or right-click the row and choose Details). The fusor's detail view opens on Info.
- Click the Domains tab.
- Click the Channel Fader card's header. The Domain Editor opens in its own window.
The detail view commits as you go. The Domain Editor buffers canvas work inside its own window until you save or cancel it with the footer buttons. That is the subject of step 5.
3. Read the curve before you touch it
The window's title names the domain. Inside it, the editor lays out top-down: the Incoming / Outgoing side tabs with the Ghost dropdown at their right, the variant tabs Constant Power and Linear, the canvas, and the property strip below it.
With the Outgoing side and the Constant Power tab selected, the canvas shows the outgoing
fader's volume curve. The X axis
is transition progress, 0% to 100%. The Y axis is the value sent to the control, 0 to 1.
Read the shape: it leaves the top almost flat, holds high through the first half, and falls away steeply at the end. That is what a quarter-cosine looks like.
Now set the Ghost dropdown to Other side. The incoming side's curve draws underneath in its own color at reduced opacity.
The two curves cross a good way above the middle of the canvas. Two straight fades would cross at 0.5. Power goes with the square of level, so each track is at a quarter power there and together they reach only half, which is a dip in the middle. This pair crosses nearer 0.707. 0.707 squared is 0.5, so the two halves add up to 1.00, the same power as one track at full, and the total holds.
4. Reshape it
Three gestures, on the Outgoing side. Watch the ghost as you go.
Drag an anchor. The orange anchors are the endpoints, at progress 0 and progress 1; they drag vertically only. Drag the right-hand end anchor up to about a third of the way from the bottom. The outgoing track now never fades out completely.
Change the interpolation. Right-click the curve line to open the Edit curve menu, and choose Interpolation for every point ▸ Linear. The eased shape becomes straight segments and the handles disappear.
Open the same menu again and choose Interpolation for every point ▸ Bezier. The handles come back and the curve bows. Switching to Bezier derives handles from the neighboring anchors but leaves any handle you shaped by hand as it was, so switching back undoes a mode switch. The Undo button beside Edit curve steps back one change at a time.
Drag a bezier handle. Click the left-hand anchor. Its handle appears as a small square at the end of a thin line. Drag the square to the right. The fade now leaves full and stays there longer before turning down.
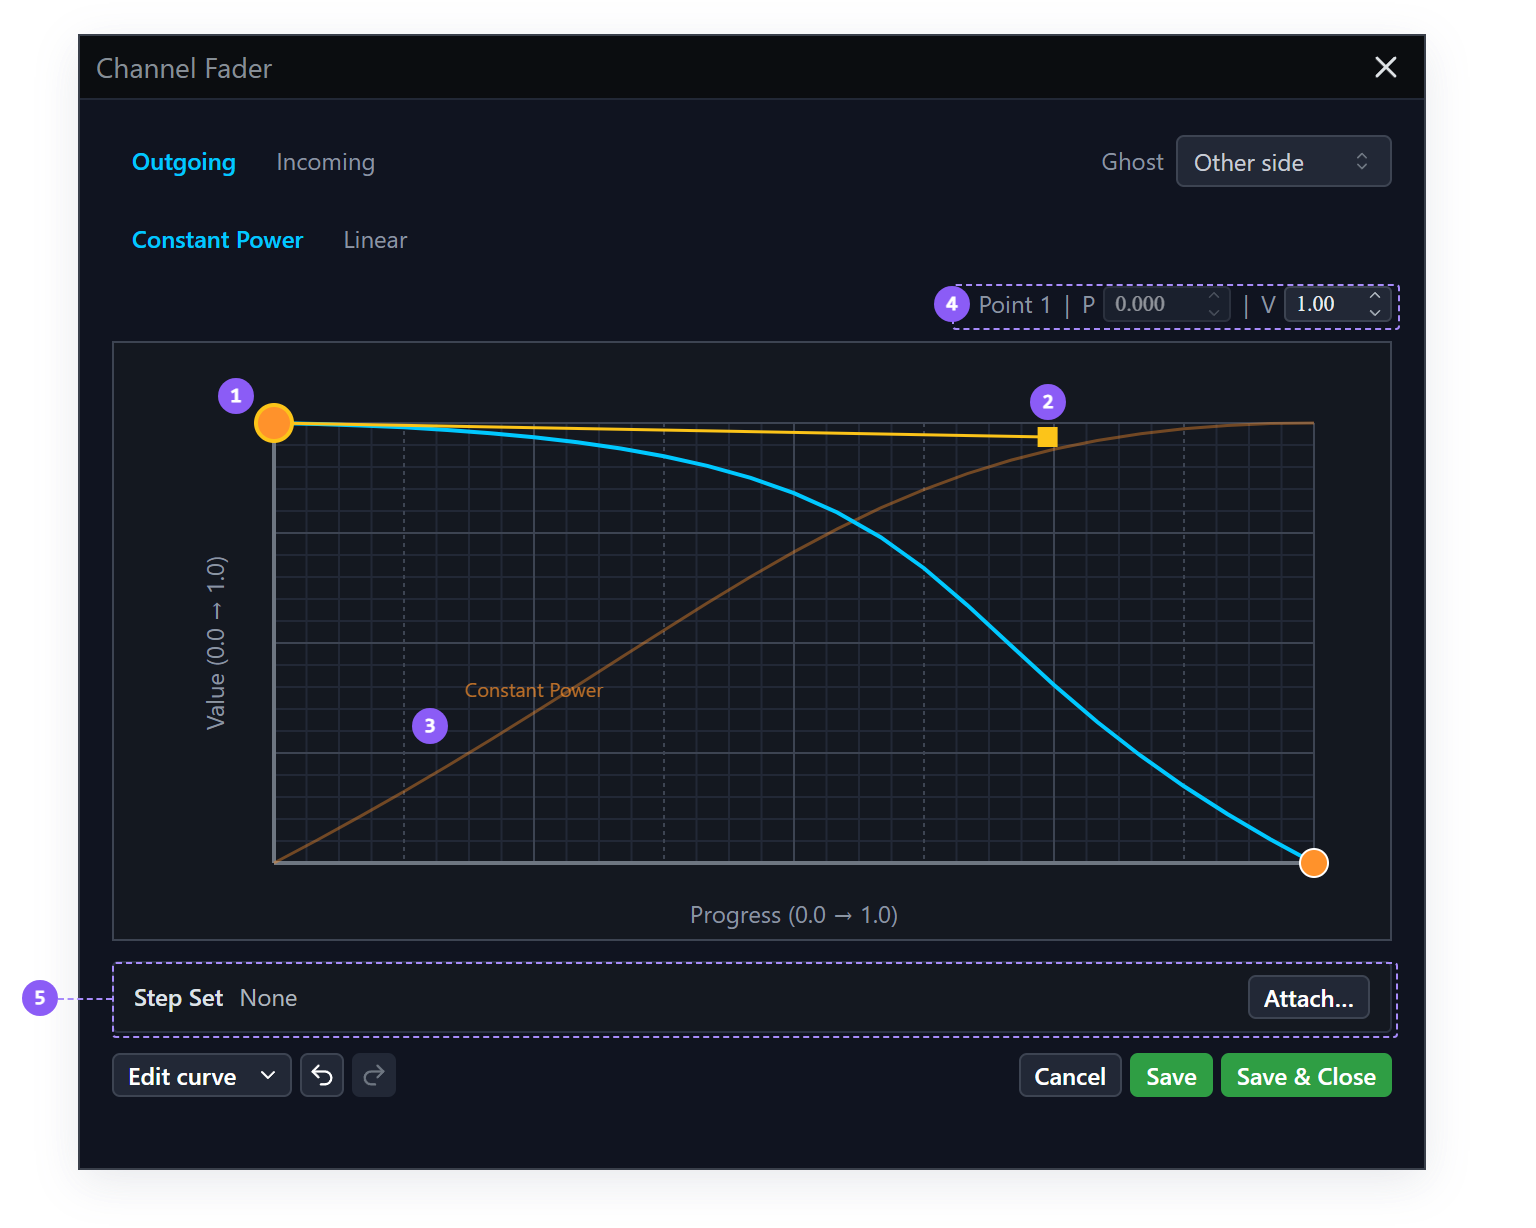
- Selected anchor: the yellow outline marks the anchor you clicked.
- Bezier handle: the square at the end of the stem. Dragged right, it holds the curve at full for longer.
- Ghost curve: the incoming side, labeled with its variant's name and drawn underneath because Ghost is set to Other side.
- Anchor readout: the selected point, its progress (P) and its value (V). You can type into V, and into P on any anchor between the two ends.
- Step Set: None, so the lane is continuous.
Look at where the two curves cross now. It has moved, and the pair is no longer symmetric.
The full gesture set, middle anchors, Linked and Independent handles, the point menu and Edit curve menu, and off-canvas handle retrieval, is in Curve Editor.
5. Save it
Look at the bottom of the editor. Three buttons: Cancel, Save and Save & Close.
Cancel closes the editor without asking, leaves the fusor as it was, and the buffered canvas work never reaches the file. Save writes the curve and leaves the editor open. Save & Close does both.
Click Save & Close.
The shape is in the .fusor file in your library's fusors/ folder from that moment. This footer is
the commit for canvas work. The fusor loads that shape the next time you pick it, after a restart,
and on any machine you send the file to.
6. Run the difference
Close the editor and the detail view, and run the fusor again exactly as you did in step 1.
It does not sound like your reference run. The outgoing track holds up longer, the blend is louder through the second half, and when the run completes the outgoing track is still audible. That is the shape you drew.
The fusor you run is the fusor on disk, every time. That is why the earlier save reaches this run: Save & Close wrote the edit before you reloaded the fusor.
7. Put the shipped shape back
You have edited one of the example fusors, so it is your own now and its version number is gone. The incoming side still holds the shipped shape, and the shipped outgoing curve is the incoming curve reversed, so you can rebuild it exactly from the other side:
- Reopen the editor as in step 2 and switch to the Incoming side tab.
- Click Edit curve on the bottom row and choose Copy curve.
- Switch to the Outgoing side tab. Click Edit curve and choose Paste curve. The incoming curve replaces the one you reshaped.
- Click Edit curve once more and choose Flip ▸ Left–right. Progress becomes 1 − progress, and the curve now falls from full to silence.
With Ghost still on Other side, the two curves cross near 0.707 again. Save & Close.
Copy, paste and flip put the matching curve on the opposite side of any domain. Build a constant-power crossfade uses the same three steps to build this pair from scratch.
What you learned
- That a shipped fusor's curves open in the Domain Editor, reached from the Fusors list via the info icon → Domains tab → a domain card's header.
- How to read a curve: X is progress, Y is the value sent, orange anchors are the endpoints.
- That Ghost → Other side draws the other side underneath, and that where the two curves cross is what makes a crossfade constant-power.
- Three gestures: dragging an anchor, switching interpolation between Bezier and Linear from the Edit curve menu, and dragging a bezier handle.
- That switching interpolation back is the undo for switching it, because hand-shaped handles are not overwritten.
- That the Domain Editor buffers canvas work and its footer commits it, so Save & Close is what
puts the curve into the
.fusoron disk. - That Copy curve, Paste curve and Flip ▸ Left–right put the matching curve on the other side.
Where to next
- Build a step set: a lane that jumps between named levels.
- Author your first fusor: building a fusor from an empty draft.
- Curve Editor: every gesture on the canvas, the right-click menu, and the handle rules.
- Domains: the cards this editor opens from.