Author Your First Action
The first of the Authoring Tutorials. In Actions and Pad Mode you fired actions someone else wrote, from a pack someone else built. Here you write your own and build a pack to hold them.
Two short actions come first, typed as text in the Code tab. Then a timed one, built a card at a time in the structured Step Editor: it cuts the bass on both decks, holds for two seconds, and puts it back. Last, a pack of your own with all three on its pads.
Before you start
- The Player Tutorials done, through Actions and Pad Mode at least.
- A track playing on at least one deck, so you can hear the result.
1. Write a short action in the Code tab
- Click the book icon in the player window's toolbar.
- In the Library window's header, click Actions, then the Actions sub-tab.
- Click the blue + in the list header (tooltip New Action).
- Type the name Cut EQ Lows and confirm.
The file is written straight into your library's actions/ folder and its detail view opens. You
name the action, Fusor Studio names the file.
The detail view has two tabs, Notes and Code.
On Notes, set Description to Cuts both decks' EQ low bands. Click outside the field to commit. This surface autosaves on blur, so there is no Save button to look for.
Leave Apps empty. App tags are informational: they filter the list. EQ works everywhere, so there is nothing to declare.
Click the Code tab. It is a single text area, empty for a new action, and it holds the action's steps as one statement per line. Type:
SET deck.a.eq.low CUT
SET deck.b.eq.low CUT
Click outside the text area. That is the save: the Code tab commits on blur, the same as the fields
on the Notes tab. If you typo something, the border turns red and the errors appear underneath as
Line N: <message>. Fix the line and click out again.
CUT is the EQ band's fully-cut position. Writing the name says what you meant, and it stays correct
if the mapping underneath changes. The full set for an EQ band is CUT, UNITY and BOOST_MAX.
deck.a and deck.b name decks A and B directly. If your deck pair is not A and B, use yours. Step
14 comes back to that choice.
2. Write its partner
Same steps: + in the list header, name it Reset EQ Lows, description Returns both decks' EQ low bands to unity., Apps empty.
On the Code tab:
SET deck.a.eq.low UNITY
SET deck.b.eq.low UNITY
Click out. Two actions in the library, and between them a pair you can use: one cuts, one puts back.
3. Create a timed action
Text is quick for two lines. For anything with more steps, the Step Editor is the surface you want: a window with a card per step, an address picker driven by the canonical mapping, and dropdowns for values.
- Click the blue + in the Actions list header again.
- Name it My Bass Kill.
The detail view opens. On the Notes tab, set Description to Cuts both decks' EQ lows for two seconds, then returns them to unity. Click out of the field to commit.
Leave Apps empty. EQ is universal.
The Tutorials pack's Timed Bass Kill is this same action, shipped ready-made. Building it yourself is how you learn the editor.
4. Open the Step Editor
To reach the Step Editor: click the book icon in the player window's toolbar, click Actions in the window header, then the Actions sub-tab. Open the action you want, or create one with the blue + in the list header. Click its Code tab, then the pencil icon at the right end of the tab bar (tooltip Open Step Editor).
A separate window opens, titled Action Editor, with the action's name beside the title. Top to bottom: the Short ID field, a scrolling stack of step cards, and an Add step affordance at the bottom.
This window has its own Save. Everywhere else in the Library, edits commit on blur. Here they do not. Nothing reaches disk until you click Save in the footer, and the header shows an italic unsaved marker while there are pending edits.
Every field of every step type is catalogued in Action Editor.
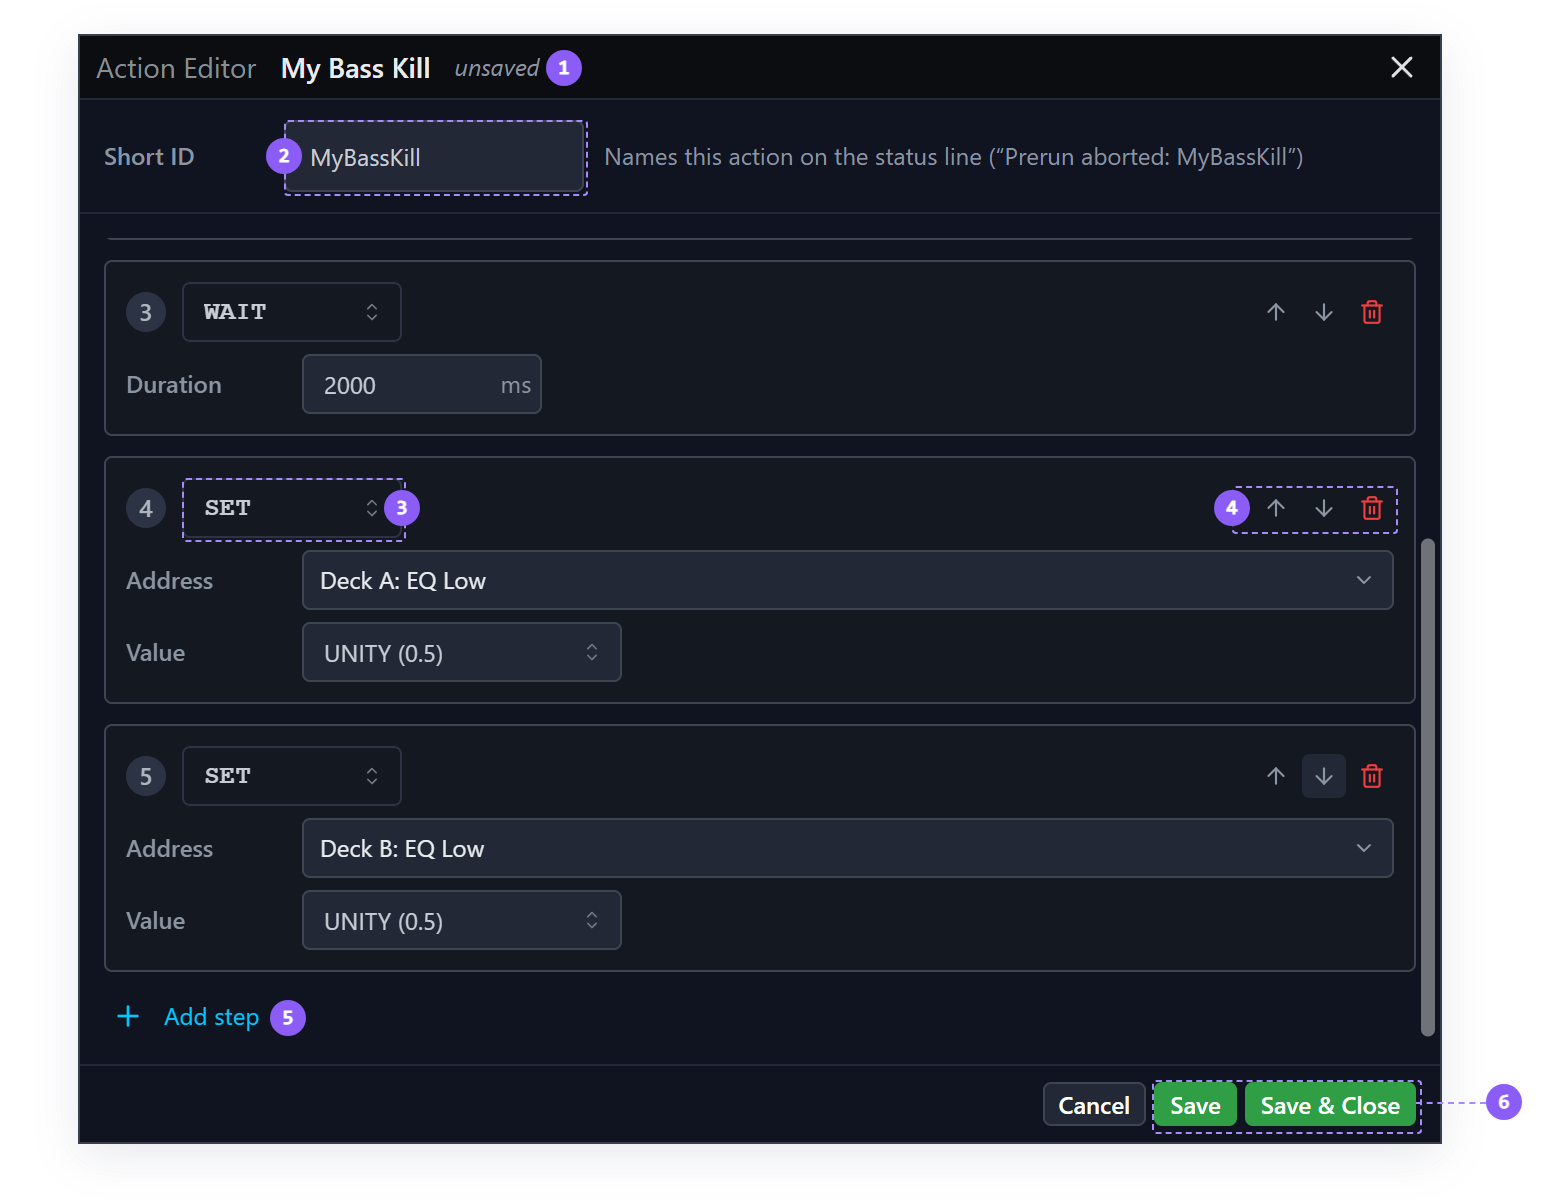
- unsaved: shown while there are edits not yet saved.
- Short ID: required. It names the action on the status line.
- Step type: sets what the step does.
- Step controls: move the step up or down, or delete it.
- Add step: adds a step card at the bottom of the stack.
- Save and Save & Close: nothing reaches disk until you click one.
5. Set the Short ID
The Short ID field is at the top, and it is required. An action without one will not run.
Type MyBassKill.
When an action fails or is skipped, the status line has to say which action, and it has about
forty characters for the whole message. Names are free-form and often too long, so the status line
uses the Short ID: ACT2-Prerun aborted: MyBassKill. Up to 12 characters, from letters, digits,
space, dot, underscore and hyphen.
While the field is empty or invalid it outlines red and Save is disabled. Pick something you would recognize at a glance mid-transition.
6. Cut the first deck's lows
Click Add step at the bottom. A card appears as a SET step, which is the default type.
Each card has a header with a type selector, up and down arrows to move the step, and
a red trash icon. Underneath are the fields for that type. A SET has two: Address and
Value.
-
Click the Address field. A popover opens with every control Fusor Studio can write to, grouped by region: Incoming, Outgoing, Deck A through Deck D, FX 1 to FX 4, and Common. Each region collapses; there is a search box at the top that filters across all of them at once.
-
Expand Deck A and choose EQ Low. (Or type
lowin the search box.) -
Click the Value field. It is a dropdown, because this address is an EQ band, which has named positions. Three of them, each shown with the number it stands for:
Choice Meaning CUT (0)Fully cut UNITY (0.5)Center, no boost and no cut BOOST_MAX (1)Fully boosted Choose CUT (0).
There is also a Custom... option at the bottom of that list, which swaps the dropdown for a
number box if you need a value between the named ones. A Named link takes you back. Use
symbolic names first: UNITY says what you meant and stays correct if the mapping underneath changes.
7. Cut the second deck
Click Add step again and repeat: Address → Deck B → EQ Low, Value → CUT (0).
If your deck pair is not A and B, use yours.
8. Add the wait
Click Add step a third time. Another SET card appears. Change it.
- Open the card's type selector and choose WAIT.
- The card's fields are replaced with a single Duration field, prefilled with
100milliseconds. - Change it to
2000.
Changing a step's type replaces its payload with a fresh default for the new type. Nothing is preserved across the change, so it is easier to set the type first and fill the fields after.
WAIT blocks: the steps after it do not run until it is done. It is also abortable, and the
hold-to-abort gesture on a pad ends a wait immediately.
9. Put the lows back
Two more steps, the same as steps 6 and 7 with the other value:
- Add step → Address → Deck A → EQ Low → Value → UNITY (0.5)
- Add step → Address → Deck B → EQ Low → Value → UNITY (0.5)
Five cards, and they run top to bottom. If one is out of order, the up and down arrows on its header move it; they are disabled at the ends of the list. The trash icon deletes within the editor, and like everything else here it is not on disk until you save.
10. Save
Click Save in the footer. The unsaved marker in the header clears.
Save keeps the window open, which is what you want while you are still working. Save & Close does both in one click. Cancel appears only once there is something to cancel, and it closes the window without writing, so a Cancel you did not mean discards the session's edits.
Now switch back to the Library window's Code tab. Your five steps are there as text:
SET deck.a.eq.low CUT
SET deck.b.eq.low CUT
WAIT 2000
SET deck.a.eq.low UNITY
SET deck.b.eq.low UNITY
Two views of one file. The Code tab autosaves on blur, the Step Editor saves explicitly, and both
write the same .faction. If you edit in both at once, the last save overwrites the other, so work in one at a
time.
11. Build a pack
A pack is eight slots that map actions onto pads.
- In the Library window's header, still under Actions, click the Packs sub-tab.
- Click the blue + in the list header (tooltip New Pack).
- Name it My Pack and confirm.
An empty pack file is written to your library's Packs/ folder with the .fpack extension. The Packs
list now has a row for it, reading 0 in the Actions column.
Click the info icon on the My Pack row (or right-click → Details) to open the pack's form. It is a small fixed shape:
| Field | What it is |
|---|---|
| Name | The display name. The on-disk filename is regenerated from it; the pack's id is preserved across renames. |
| Short name | The compact label used where there is not room for the full name. |
| Actions | How many slots are filled. Read-only. |
| Notes | Free-form: what this pack is for. |
| Created | Read-only. |
Set Notes to Actions built in the Authoring Tutorials. It saves on blur, like everything else on a detail view.
Two packs can share some actions and differ on others.
12. Fill the slots
- Right-click the My Pack row and choose Edit Pad Slots.
- The slot editor opens as a two-column overlay inside the Library window: eight numbered slots
down the left, and a filterable list of every library action not already in this pack down the
right. The header shows a
<filled>/8counter. - Drag Cut EQ Lows from the right column onto slot 1. The drop target outlines in dashed
blue as you hover it. The slot now shows the action's name with an X to clear it, and the
counter reads
1/8. - Drag Reset EQ Lows onto slot 2, and My Bass Kill onto slot 3. The counter reads
3/8.
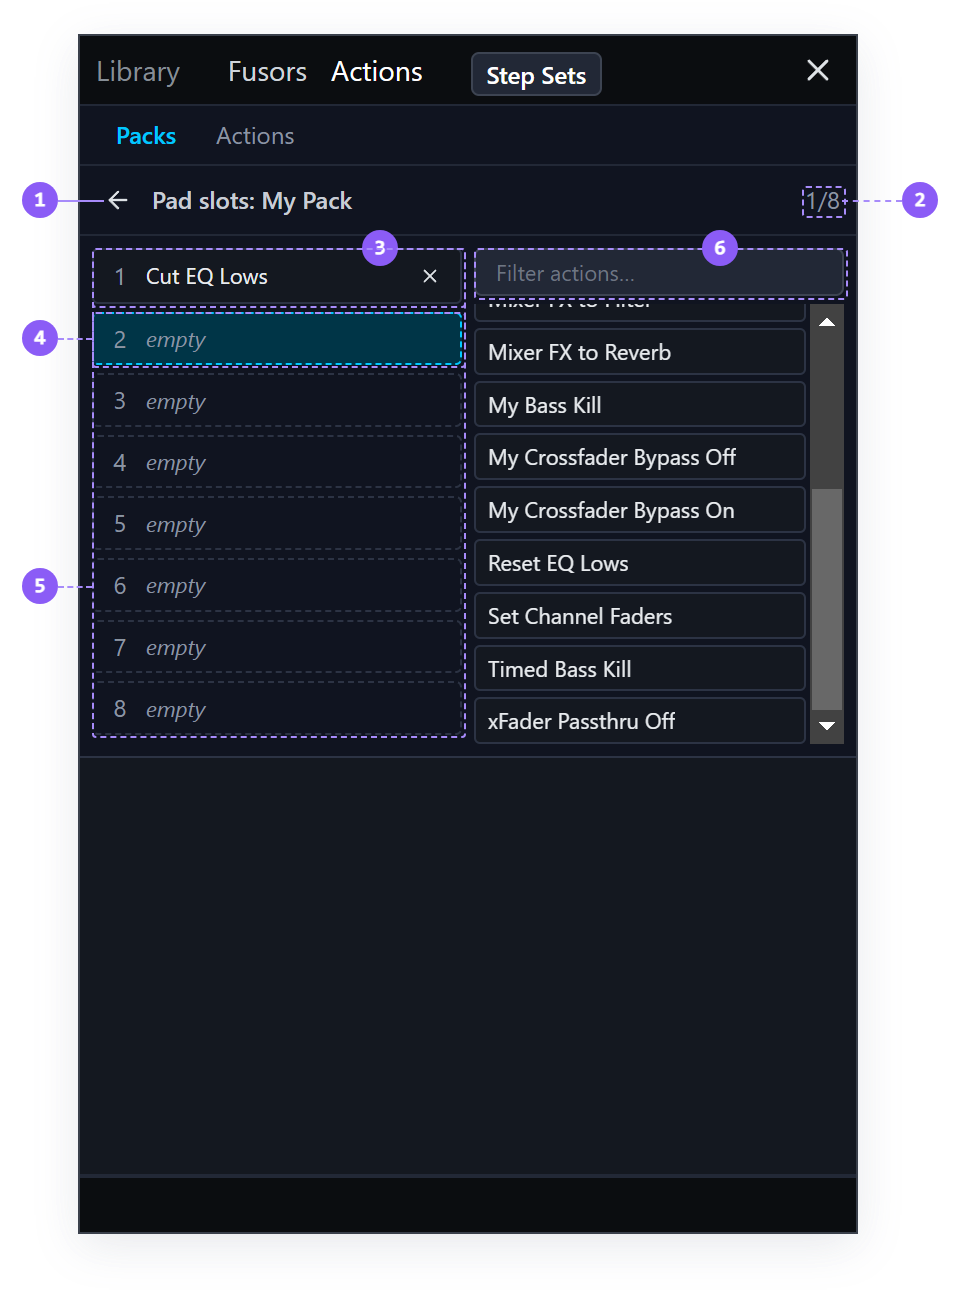
- Back arrow: returns to the pack list.
- Counter: filled slots out of eight.
- A filled slot: the action's name, and an X to clear it.
- Drop target: outlines in dashed blue while you hold an action over it.
- The eight slots: one per pad, numbered as the pads are.
- Filter actions…: narrows the list of library actions not already in this pack.
Slot edits write to disk as you make them. There is no Save button here.
Two more drag rules worth knowing before you leave this screen:
- Dragging onto an occupied slot replaces the action already in it.
- Dragging one filled slot onto another moves the action. If the target is occupied, the two swap.
Click the back arrow at the top-left to return to the Packs list.
13. Make it active, and fire
Right-click the My Pack row and choose Set Active. The row goes bold blue, and the Tutorials pack is no longer active. Switch back to it the same way whenever you want its pads.
Turn on Pad Mode with the grid icon in the toolbar. With a track playing:
- Click pad 1. Both decks' lows drop out.
- Click pad 2. They come back to center.
- Click pad 3. The bass drops out of both decks, the pad shows a spinner, and two seconds later the lows return.
Now click pad 3 again and hold. A red fill sweeps across the pad and, a bit under half a second in, the action is aborted, mid-wait. The lows are still cut, because the steps that would have restored them never ran. An aborted action leaves each control where its last completed step set it. Pad 2 puts them back.
If an action must leave the rig in a known state whatever happens, the pattern for it is CAPTURE
and RESTORE, which the next tutorial builds.
14. Physical deck or role addresses
Your actions name deck.a and deck.b. Fusor Studio also has role addresses,
deck.incoming.* and deck.outgoing.*, which appear as the Incoming and Outgoing regions at
the top of the same address picker. The Tutorials pack's Mixer FX actions use them. Choosing between
the two comes down to one fact:
Roles change deck at every transition. Outgoing is the deck mixing out and Incoming the deck mixing in, and the two swap when a transition completes. Between transitions an action with role addresses still runs, on whichever deck the last transition left in that role.
So:
- An action for a pad you might press at any moment names a physical deck.
deck.a.eq.lowmeans Deck A's low band and always will. - An action you author for a fusor uses role addresses, not physical decks. A role keeps the action working after the decks swap.
If you later want this same bass kill as a pre-run action, duplicate it (right-click → Duplicate) and change the four addresses to the Incoming and Outgoing regions. Same steps, different target.
What you learned
- That the Code tab holds an action's steps as one statement per line, and saves on blur.
- That the Step Editor is a separate window with an explicit Save, where everything else in the Library commits on blur.
- That Short ID is required, and why the status line needs it.
- How the grouped address picker is organized, and that value fields adapt to the address.
- That symbolic values come first, with
Custom...for a value between them. - That changing a step's type resets its fields.
- That
WAITblocks, and that aborting mid-action leaves the rig where it stopped. - That a pack is eight slots, that slot edits write to disk immediately, and that dragging onto an occupied slot replaces while dragging slot-to-slot swaps.
- That one pack is active at a time, and that switching packs switches what the pads fire.
- When to address a physical deck and when to address a role.
Where to next
- Bypass the Crossfader, and Put It Back:
CAPTUREandRESTORE, and the crossfader bypass you have been setting by hand. - Action Editor: every step type's fields, the Code tab, the multi-address picker.
- Pack Authoring: packs in full, the metadata form, slot swapping, several packs at once.