Channel Fader
Three Channel Fader fusors, four runs, all of them by hand.
The fusor is Channel Fader. It modulates one thing: the two channel faders, one per deck. The crossfader goes into bypass in run one and stays there for the rest of the tutorials. It is still the progress actuator: you move it to advance the transition, and the fusor sets the level.
The Channel Fader card has a 1 / 2 switch that picks between two fade curves, so this fusor run on its own is a crossfader-curve switch you set per transition. Run three uses it. Run four loads two more Channel Fader fusors, built for the other two mix points.
Before you start
- Setup finished, with a status line reading
Unarmedand noUNCAPTUREDprefix, and a Free Trial or license active. - The example files in your library. They are downloaded from fusorstudio.com, and Guided Setup offers them on its first screen. The three Channel Fader fusors are among them. If you did not install them then, they are in Settings → General under Example Files. See Setup.
Run one: The first transition, by hand
1. Make Tutorials the active collection
A collection is a named group of fusors. The active collection filters the fusor list when you load a fusor.
Two collections arrive with the example files. Samples holds every example fusor. Tutorials holds the fusors these tutorials use. Make Tutorials the active one:
- Click the book icon in the toolbar. The Library window opens.
- In its header, click Fusors. That section has two sub-tabs, Collections and Fusors. Choose Collections.
- Right-click the Tutorials row and choose Set Active.
The row's name turns blue and bold, which is how the active collection is marked. One collection is active at a time: if another one already was, the menu item reads Set Active (switch) and choosing it moves the marker. Deactivate on the active row clears it, which removes the filter.
If the Tutorials row is already blue, it is already active and its menu offers Deactivate. Leave it as it is.
We'll come back to the Library window later; go ahead and close it. The reference version of those three steps is Loading a fusor → Changing the active collection, and the definition is in Key Concepts → Collection.
2. The player window
The player window has four regions, top to bottom:
| Region | What's in it |
|---|---|
| Toolbar | The gear (Settings) and book (Library) icons on the left, the Run Mode switch and two toggles in the middle, then Pad Mode, Swap, Pin, the expand arrow and the window controls on the right. |
| Picker row | The fusor picker, a wide button showing the loaded fusor's name. |
| Progress strip | The progress meter as its background, with the arm/play control at the left end and the Abort button at the right. |
| Status line | One line of text along the bottom, with a small round telemetry light at the far right. |
The window is a fixed size and is intended to float above your DJ app. The pin icon in the toolbar turns "always on top" on or off. You can drag it around with the mouse as needed to keep it out of your way.
A reference for every control in this view is in The Player Window.
Right now the picker reads Select Fusor..., the status line reads Unarmed, and the telemetry
light is green.
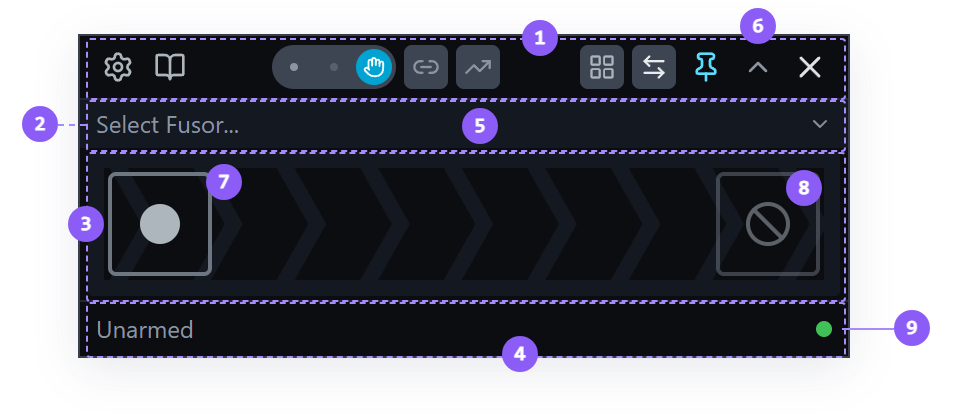
- Toolbar: three groups of icons, the gear and book on the left, the transition controls in the middle and the session controls on the right, then the window's own controls.
- Picker row: which fusor is loaded.
- Progress strip: the progress meter, with the arm control at the left end and the Abort button at the right.
- Status line: a single line at the very bottom showing what the Fusor player is doing right now.
- Fusor picker: reads
Select Fusor...until one is loaded. Clicking it opens the Library window. - Expand arrow: in the toolbar, grayed while nothing is loaded. With a fusor loaded it opens Session View.
- Arm control: arms the player. What starts the run depends on the Run Mode, which step 6 sets.
- Abort button: press and hold it. It is live only once a run is under way, so it is inert here.
- Telemetry indicator: green once telemetry is arriving from the DJ app. The other colors are in The Player Window.
3. Load the fusor
- Click the fusor picker. The Library window opens beside the Fusor player on the Fusors list view, with a Tutorials collection chip in its filter bar alongside a DJ app filter. This list shows all the fusors your DJ app can use within the Tutorials collection.
- Three rows read Channel Fader. Each has a mix point mark: three dots on a rail, start, middle and end, with the fusor's own point filled. Click the Channel Fader row whose middle dot is filled.
The Library window closes on its own and the picker now reads Channel Fader, with the same mark at its right end, before the arrow.
Loading a fusor makes no changes in your DJ app: no controls move, and no values are sent. The Fusor player now holds a definition of what to do when a transition starts.
4. Open Session View: preflight
Click the expand arrow in the toolbar. A panel opens between the toolbar and the picker row.
This panel is Session View, and everything in it is preflight.
Preflight is two things: information about what the fusor is going to do, and the settings in your DJ app the fusor relies on. It is what you read between loading a fusor and running it.
Session View is a single stack of cards read top to bottom in the order things happen during the run. Above the stack sits the fusor's name and its mix point mark. A mix point is where the listener's attention shifts from the outgoing track to the incoming track. This Channel Fader is authored for a Middle mix point: attention shifts around halfway, and both tracks play across the middle of the transition. Run four covers the other two. For additional detail see Mix Points.
Below the fusor's name and mix point mark is the author's intent: a one-line statement of what the fusor will do.
For this fusor the stack holds one domain card, headed Channel Fader. Click the card to open it.
A domain is a group of related parameters that the fusor modulates, and it spans both deck roles at once: the Channel Fader domain covers the outgoing deck's channel fader and the incoming deck's. Notice that we do not use deck labels or numbers. A fusor domain acts on a deck role, incoming or outgoing. Incoming can be deck A or deck B, or C or D, but in Session View and in every curve the incoming deck is shown on the right and the outgoing deck on the left.
Domains can be disabled during preflight, for the case where you don't want those parameters modulated by the fusor. The entire domain, incoming and outgoing, is disabled by the one switch. We'll disable a domain in a later tutorial.
To the right of the domain name are two controls:
- The 1 / 2 switch, which picks the fade curve. Run three uses it.
- Leave, the domain's End of run setting: what happens at the end of the transition to the parameters the domain modulates. Leave keeps the outgoing fader where the transition put it. The Channel Fader domain offers only Leave, so the card shows the word rather than a dropdown. You will meet the other values in EQ Swap.
In Session View you can change some aspects of how a fusor runs, before you run it.
In summary, this fusor modulates your channel faders over the course of the transition and nothing else.
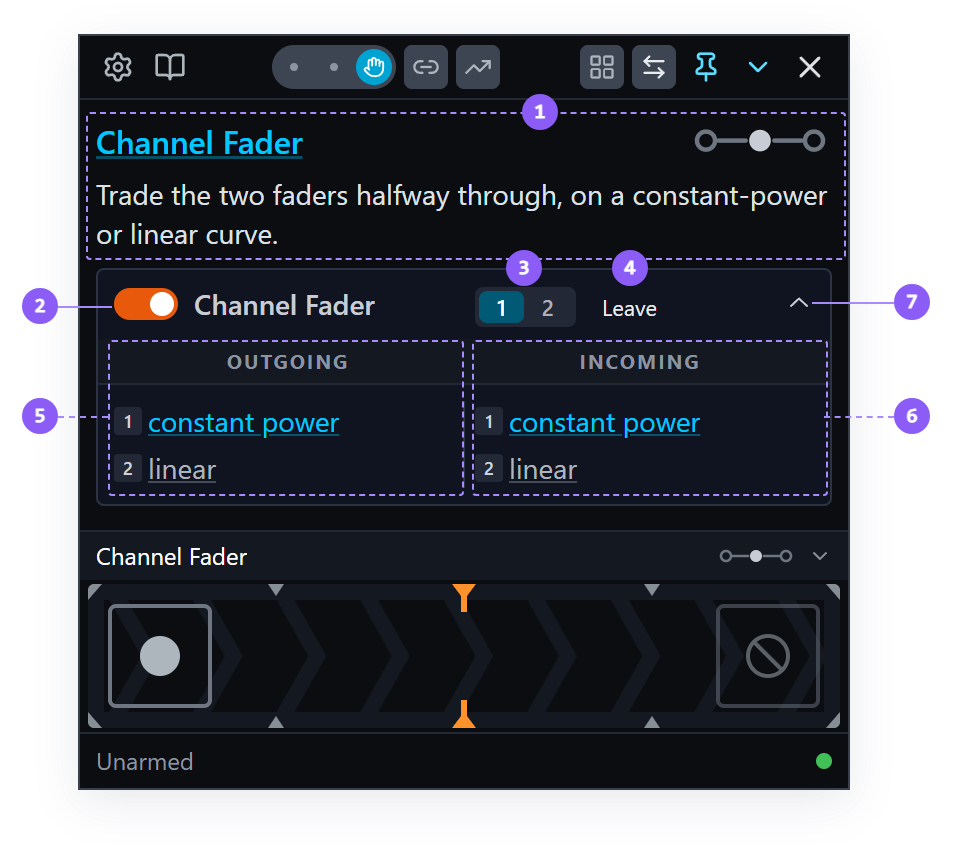
- Session View header: the fusor's name, its mix point mark and the author's intent line.
- Enable switch: enable or disable sending MIDI from this domain.
- 1 / 2 switch: picks which variant plays.
- Leave: the domain's End of run setting. Channel Fader offers only Leave, so it shows as a word.
- Outgoing side: the parameters this domain modulates on the outgoing deck.
- Incoming side: the same, on the other deck. Reading across tells you what the transition does.
- Chevron: collapses the card.
Which curve is modulated. The open card has two columns, outgoing on the left and
incoming on the right. Under each are two rows, one per variant. Each row is a small number
badge followed by the variant's name: 1 constant power and 2 linear. The variant that
plays is drawn in blue; the other is gray. The switch ships on 1, so constant power is blue on
both sides.
Only one card is open at a time.
5. Read a curve
Each of those parameters is modulated along a curve. A curve is a function of progress rather than of time: progress, x, runs from 0 to 1 across the transition, and y is the value sent to the control. The value at 0.5 is the value halfway through the transition, however long you take to get there.
Hover a variant row. A preview of that curve appears beside it, drawn across progress with no axes and no anchor marks: the shape alone.
Click the row instead and a larger preview opens, with axes and the author's control points marked as dots. It closes on Escape or a click outside it.
On the outgoing side, constant power starts at full and falls to zero, slowly at first and faster
toward the end. On the incoming side it is the mirror image: it starts at zero and rises to full.
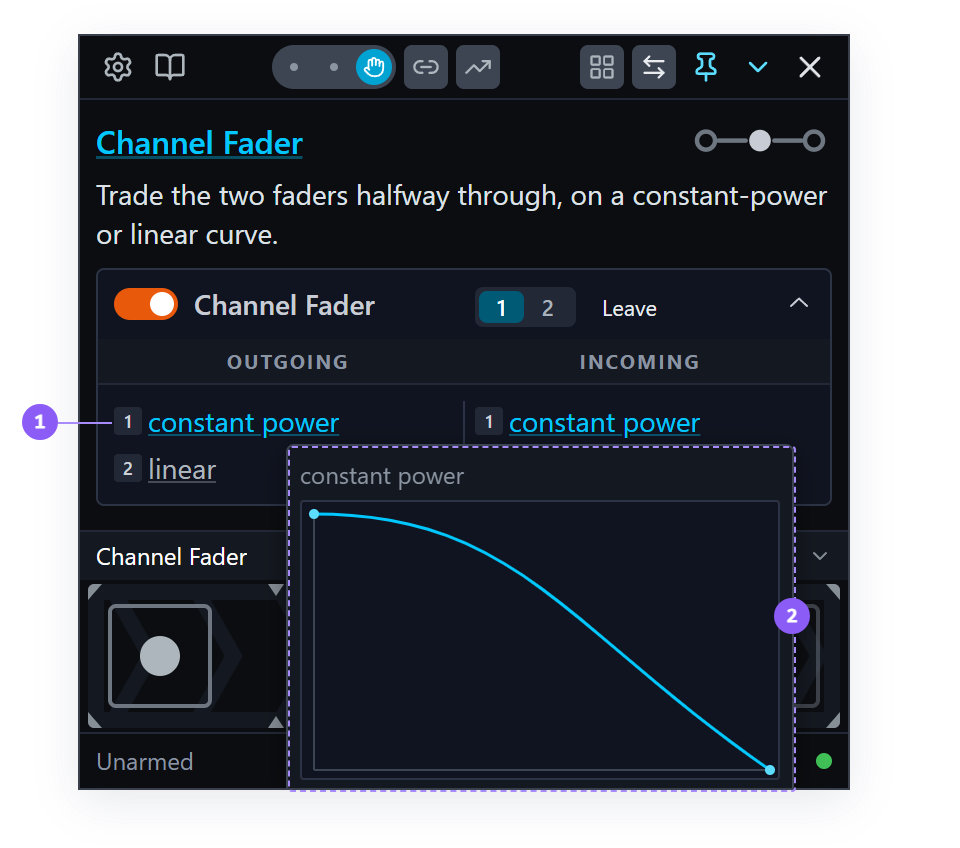
- The row clicked: the outgoing side's
constant powervariant. - Curve preview: the variant's name above the curve, and the author's control points as dots.
Curves always show progress from left (outgoing) to right (incoming), regardless of which deck is filling each role.
Click the expand arrow again to put the panel away. The full tour of Session View is in Loading a fusor → Session View.
6. Choose Manual Run Mode
In the toolbar's middle group, the leftmost control is the Run Mode switch, a pill with three positions: Auto, Mixed and Manual, left to right. The lit position is blue and shows its icon (a timer, two overlapping circles or a hand); the other two show a small dot. Manual is the default; if another position is lit, click the rightmost one.
In Manual Run Mode your crossfader sets progress. The transition is wherever the crossfader is: a quarter of the way across is 25%, all the way across is 100%. Move it slowly and the transition advances slowly; stop, and progress stops.
There is no timer in this mode, so the middle of the progress strip, where the length and tempo readouts sit in Auto, is empty. We'll use the other two positions in later tutorials.
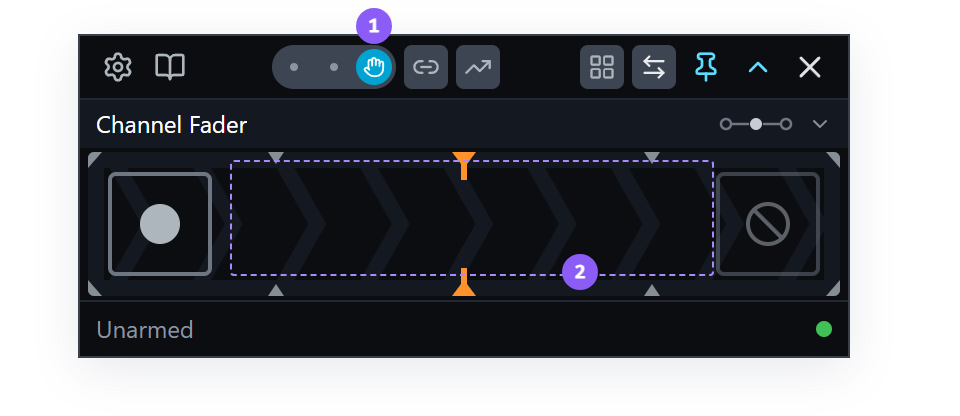
- Run Mode switch: Manual, the hand, is lit blue.
- Middle of the progress strip: empty in Manual Run Mode. In Auto it holds the length and tempo readouts.
7. Bypass your crossfader
In the Fusor player, the crossfader's position is the transition's position. Moving the crossfader advances the transition. While the crossfader is not in bypass, its own curve also changes the deck levels as it moves.
Crossfader bypass takes the crossfader out of the audio path. With bypass on, deck level comes from the two channel faders alone, and the crossfader's own curve contributes nothing wherever the fader happens to sit. Some DJ apps call it thru, through mode or pass-through. It is a state of your mixer.
It matters before a run because the crossfader is the Fusor player's progress actuator, so it travels the full width of every transition, driven by the player in Auto Run Mode and by your hand in Manual Run Mode. While it is still in the signal path, its own curve moves your volume levels in addition to whatever the channel faders are doing, whether the fusor or your hand is moving them. If the crossfader is not bypassed, parking it at the center position is not an option, since it has to move to advance the transition.
So a fusor that modulates deck levels needs the crossfader bypassed to have sole control of them. A fusor that modulates none relies either on the crossfader's own curve while it is in the signal path, or on you to modulate the channel faders with the crossfader in bypass. Fusor Studio allows for both.
Channel Fader modulates deck levels, so the crossfader goes into bypass now.
Put your crossfader into bypass by hand before you go any further. Bypass takes the crossfader out of the signal path, so deck level comes from the channel faders alone. If you have not done this before, check your DJ application's own documentation; it may be called thru or pass-through.
Bypass is a state of your mixer. It stays where you put it until you put it back.
Leave it in bypass for the rest of these tutorials. In Manual Run Mode you still move it to advance the transition, and you no longer hear it do anything.
To run fusors with your crossfader live instead, switch the fusor's Channel Fader domain off, as Auto Run Mode shows. To keep your crossfader live outside a transition, Bypass the Crossfader, and Put It Back builds a pair of example actions that put it into bypass for the length of a transition and assign it again at the end.
8. Prepare your decks
In your DJ application, on the deck pair you chose during setup:
- Load two tracks that will mix well as a classic fade: the outgoing track on deck A and the incoming track on deck B. This run mixes from deck A to deck B. The fusor's mix point is Middle, so the two tracks cross halfway through the transition. Cue the incoming track at the point where you want it to start.
- Set your channel faders. The outgoing deck's at full and the incoming deck's at zero. That is where the fusor's two curves begin.
- Set the crossfader. The faint chevron pattern in the progress meter indicates which direction the transition will run: it points from the outgoing deck to the incoming deck. Sweep the crossfader from one side to the other and watch the chevrons reverse. Leave the crossfader hard over to deck A's side, the outgoing side.
- Set the EQ knobs on both decks to neutral.
- Beatmatch the incoming track to the outgoing track, by hand or with your DJ app's sync. Fusor Studio does not do this for you.
- Start the outgoing deck playing. A transition mixes out of that deck.
Arming a fusor touches nothing in your DJ application, so where the faders and the crossfader sit before a run is always yours to set.
9. Arm it
Click the arm control, the round button at the left end of the progress strip. Its dot turns yellow, and the status line reads:
Armed: move crossfader to start
10. Run it, and find the mix mark
Start the incoming deck so its mix-in point meets the outgoing track's mix-out point on the fusor's mix point. This fusor's mix point is Middle: halfway across. The incoming deck is silent, because its channel fader is at zero.
Starting a Transition has examples of when to start the incoming deck.
Now move the crossfader toward deck B, at the pace you would bring the incoming track in. Four things happen:
- The progress meter fills behind the arm control and Abort button, following the crossfader.
- The two channel faders in your DJ app move, the outgoing one coming down as the incoming one goes up. Those are the curves you looked at in Session View.
- The status line switches to
Manualin green. - You hear a crossfade made by the channel faders alone.
Partway across, stop moving. Progress stops, and so do both faders. Move the crossfader back a little: progress reverses and the faders follow. At any speed, or backwards, each parameter is at its curve's value for the crossfader's position. Then continue across.
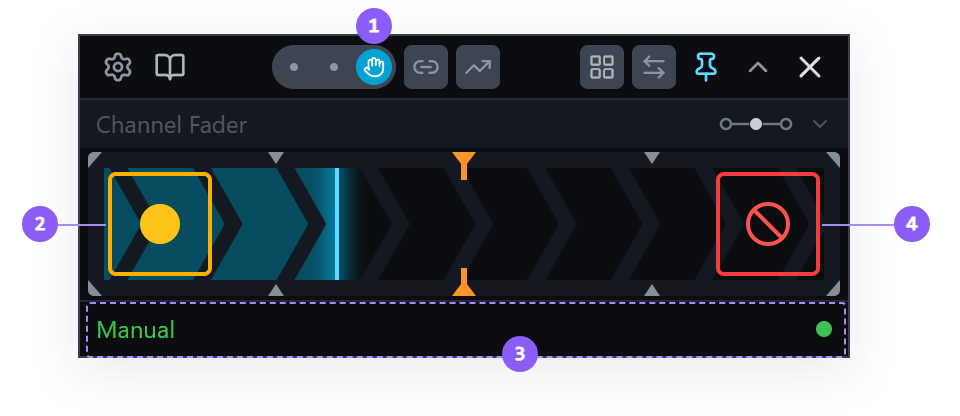
- Run Mode switch: Manual, the hand, is lit blue.
- Arm control: a yellow dot in a yellow frame while the run is under way. Clicking it does nothing.
- Status line:
Manual, in green. - Abort button: lit red now that a run is under way. Press and hold to end the run.
Look at the progress meter as you go. An orange mark sits at its center. That is the mix mark: where this fusor's mix point falls on the transition. Small gray quarter marks show the start, a quarter, three quarters and the end of the run.
When you run by hand, the mix mark is a reference point: bring the progress meter to the mark as your incoming track reaches the point where attention should shift to it, and the fusor's progress keeps pace with the track. Take the rest of the transition at whatever pace suits the music.
11. Finish it
Push the crossfader all the way to deck B's side. Progress reaches 100% and the status line reads:
Completed — stop outgoing deck or press End.
The arm control has changed into an END button. The transition is at its end but not finished, because the Fusor player is waiting for the outgoing deck to stop. The transition completes in one of two ways:
- Stop the outgoing deck in your DJ app. Completion proceeds on its own.
- Press END. This commits the transition immediately. It does not stop your outgoing track; it tells the player to stop treating that deck as the outgoing side.
Stopping the deck is generally the better option. Depending on the fusor and how it is set up, ending the run while the outgoing deck is still playing can make that track audible again.
The Fusor player does not control deck transport. You start, cue and stop your decks.
Look at the two channel faders after it commits. The outgoing one is at zero and the incoming one is at full, where the curves ended. That is the Leave setting on the card. The full set of End of run values is in Domains → End of run.
The deck roles swap. The deck that was incoming, deck B, is now the outgoing one, so the next transition runs back the other way across your mixer and the track that just arrived is the one you mix out of. The completion sequence is in Arming and Running → Completion and role swap.
The Fusor player returns to its idle state with the same fusor still loaded.
Run two: The other direction, and backing out
Same fusor, the other way across the mixer: from deck B to deck A. Your crossfader is already on deck B's side, where run one left it.
12. Set up, and run it back
- Load a new incoming track on deck A, or cue the one you just mixed out of, at the point where you want it to start.
- Check your channel faders. Deck B's should be at full and deck A's at zero, which is where this run starts.
- Deck B is still playing, so click the arm control, start deck A when you are ready, and move the crossfader toward deck A.
The chevrons in the progress meter now point from right to left: the meter follows your crossfader. Session View and the curves still draw the outgoing deck on the left, whichever physical deck holds the role.
13. Back out from the end
Push the crossfader all the way across. The status line reads Completed — stop outgoing deck or press End., and the arm control reads END.
Don't press it. Move the crossfader back toward deck B instead. The transition returns to running, the faders follow their curves back, and you can keep moving the crossfader. Nothing is committed until the outgoing deck stops or you press END.
Take it to the end again and stop the outgoing deck. The roles swap back, so deck A is outgoing for run three, with its fader at full and deck B's at zero.
Run three: Switch the curve
14. Set the switch to 2
Open Session View and find the 1 / 2 switch in the Channel Fader card's title row. It is on 1. Click 2.
Open the card. On both sides linear is now blue and constant power is gray. Hover each linear
row:
| Variant | Outgoing fader | Incoming fader | Halfway through |
|---|---|---|---|
| 1, constant power | Falls from full to zero across the whole run. | Rises from zero to full across the whole run. | Both at about 71%, so the combined loudness holds steady. Suits two tracks at a similar level. |
| 2, linear | Holds at full until halfway, then falls in a straight line to zero. | Rises in a straight line to full by halfway, then holds. | Both at full. Suits quiet intros and outros. |
The switch picks the curve for both sides at once. It is a session edit: it changes the loaded fusor, it is saved to the fusor file as you make it, and it is locked while a run is under way. Set it between transitions. See Loading a fusor → What session edits cover.
Close Session View.
15. Run it
This run mixes from deck A to deck B. Load a fresh incoming track on deck B, cue it, and set its EQ knobs to neutral. The faders are already where this run starts.
Click the arm control, start deck B so its mix-in point meets deck A's mix-out point halfway across, and move the crossfader toward deck B.
Through the first half, the incoming fader rises to full while the outgoing fader stays at full. Both tracks play at full around the mix mark. Through the second half, the outgoing fader comes down to zero.
Take it to the end and stop the outgoing deck.
Set the switch back to 1 before you move on, so the later tutorials load the fusor these pages describe.
Run four: Mix points
Two more Channel Fader fusors, one for each of the other mix points. Each is the fader shape its mix point is built on, so running them beside the Middle one lets you hear what a mix point means.
16. Where the mix point shows
A fusor records a mix point: where the listener's attention shifts from the outgoing track to the incoming track. It is one of three: Start, Middle or End.
It shows in four places:
- A mark in the Fusors list, on each fusor's row. Choose Mix Point in the list's Sort control to group start, middle and end.
- A mark beside the fusor's name at the top of Session View: three dots on a rail (start, middle and end), with the fusor's point filled.
- The same mark on the fusor picker, between the loaded fusor's name and the chevron. During a run the rest of the button dims and the mark stays at full strength. Hover it for the point's name and description.
- The mix mark, the orange marker on the progress meter: at 50% for Middle, and on the meter's edges for Start and End. An End fusor with an effect tail draws it 80% of the way along the strip, as on Wash Out. Mix mark and Quarter marks in Settings → General set when each is drawn; the mix mark ships on Always and quarter marks ship on.
The Channel Fader you have been running is a Middle because its curves are centered on halfway: on constant power the two faders are at equal level at 50%, and on linear both reach full at 50%. Attention shifts around halfway, both tracks play on past that point, and the outgoing track plays out underneath.
The roles swapped when run three completed, so deck B is outgoing now and the next run goes from deck B to deck A. The chevrons in the progress meter show the direction.
17. Start: the incoming track at full from the first beat
Click the fusor picker and click the Channel Fader row whose start dot is filled.
Open Session View. The card has the same 1 / 2 switch, with two variants named eased and
linear. Below the card's title row is a preflight line:
Level jumps at the drop. You may need to adjust gain as the incoming comes in.
Hover the curves. The incoming curve is flat along the top: the incoming deck is at full level for the whole run. The outgoing curve falls from full to zero. Leave the switch on 1.
Close Session View. The orange mark on the progress meter is now at the outgoing edge, where the run starts.
Prepare your decks:
- Load an incoming track on deck A with no intro, one whose first beat is the moment you would want it in the mix, and cue it at that point. Leave it stopped. Deck B, the outgoing deck, needs at least a transition's length left to play.
- Leave the channel faders where run three left them. Deck B's at full and deck A's at zero. The incoming curve takes deck A to full as the run starts.
Click the arm control. Start deck A on its first beat and move the crossfader toward deck A in the same moment. The incoming track enters at full level, and across the run the outgoing track fades out beneath it. The level is louder at the start, while both tracks play at full.
— in a Manual run, the incoming fader goes from zero to full on the first crossfader movement (Drop In says "on the first tick" for an Auto run). Whether ERA instead travels it onto the flat curve, and how fast, is unchecked for this fusor in Manual.
Take it to the end and stop the outgoing deck.
18. End: the outgoing track at full until the cut
Click the fusor picker and click the Channel Fader row whose end dot is filled.
Open Session View. The variants are eased and linear again, and the preflight line reads:
Level climbs before the cut. You may need to adjust gain as the incoming comes up.
Hover the curves. The outgoing curve holds at full for the whole run and drops to zero at the very end. The incoming curve rises from zero to full beneath it. Leave the switch on 1, and close Session View. The orange mark is now at the incoming edge, where the run ends.
Prepare your decks. Deck A is outgoing now, and this run goes from deck A to deck B:
- Choose a point on deck A where the track can stop, such as the end of a phrase. That is its mix-out point. All of an End run comes before the mix point, so the run starts a whole transition's length ahead of it.
- Load an incoming track on deck B with an intro at least as long as the run, and cue it.
- Leave the channel faders where the last run left them. Deck A's at full and deck B's at zero.
Click the arm control, start deck B, and move the crossfader toward deck B, so that you reach the end as deck A reaches its mix-out point. The incoming track rises under an outgoing track held at full, and the outgoing track cuts at 100%.
Take it to the end and stop the outgoing deck. Its fader is already at zero.
Every value, and how each one is meant to be used, is in Mix Points. The level each pair adds up to is in Crossfader Setup and Deck-Level Modulation → Deck levels and the mix point.
What you learned
- That collections narrow the fusor picker, and that one of them is active at a time.
- The four regions of the player window and the controls in each.
- That loading a fusor is inert.
- That Session View is preflight: what the fusor is going to do, and what you need to set on your rig before it does.
- That a domain spans both deck roles, that one switch disables both sides, and that Session View names the curves each side modulates.
- That a domain acts on a deck role rather than a deck number, and that Session View and the curves draw incoming on the right.
- That every parameter is modulated along a curve read against progress rather than time, and that you can see the shape by hovering it or clicking it.
- That in Manual Run Mode the crossfader's position is the transition's position: progress follows it forwards and backwards, and stops when it stops.
- What crossfader bypass is, that a fusor that modulates deck levels needs it, and that a bypassed crossfader is still the progress actuator.
- That the mix mark is a reference point for a hand run: bring progress to it as the incoming track arrives.
- That completion waits on the outgoing deck, END is how you commit without waiting, and the roles swap afterwards, so the next run goes back the other way.
- That moving the crossfader back from 100% returns the transition to running.
- That the Channel Fader domain ends on Leave, so the faders finish where the next run starts.
- That the 1 / 2 switch picks which of the Channel Fader's two curves plays, for both decks at once, and that it is a session edit saved to the fusor file.
- That a fusor's mix point is one of three, that it shows in the Fusors list, on Session View, on the fusor picker and as the mix mark on the progress meter, and that each one is a different fade shape: Start brings the incoming track in at full, Middle crosses halfway, End holds the outgoing track at full until it cuts.
Where to next
- EQ Swap: the same Middle fade with a 3-Band EQ domain beside it.
- The Player Window: every control in the window, as a reference.
- Manual Run Mode vs Auto Run Mode: who owns the timing in each of the three modes.
- Crossfader Setup and Deck-Level Modulation: the three setups in full, what a fusor does under each, and the constant-power authoring pattern.
- Starting a Transition: when to start the incoming deck for each of the three mix points.
- Mix Points: the three values, and what each one is for.